Illuminate your space with style and sophistication by exploring innovative lighting solutions. As interior design trends continue to evolve, one timeless element remains a favorite among homeowners and designers alike: hanging light fixtures. These versatile pieces not only provide essential lighting but also serve as stunning focal points that can transform any room. Imagine the impact of a beautifully crafted fixture casting a warm glow over your dining table or adding a touch of elegance to your living area. Discover the endless possibilities and elevate your home decor with the perfect hanging lights today.
Why Choose Hanging Light Fixtures?
Hanging lights are versatile and come in various designs, making them suitable for almost any room in your home. Whether you're looking for a chandelier for your dining room or a simple pendant light for the kitchen, these lights can create a focal point in your interior design.
Advantages
- Versatility: Available in numerous styles, colors, and materials.
- Illumination: Provide excellent lighting for large spaces.
- Aesthetic Appeal: Enhance the overall look of the room.
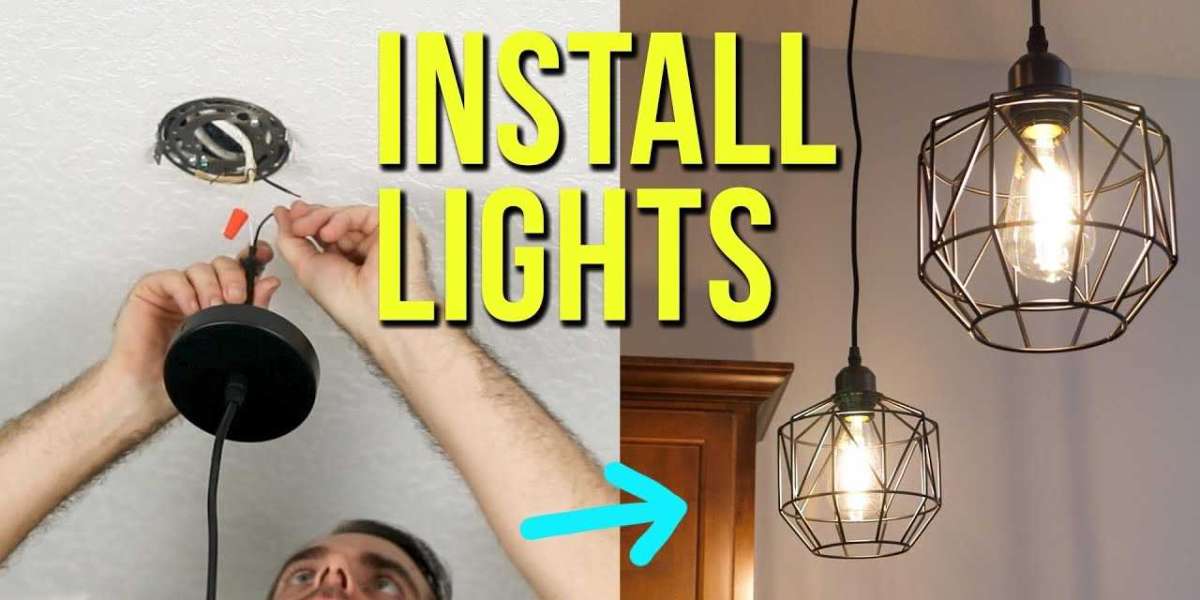
Safety First: Preparing for Installation
Before diving into the installation process, it's crucial to prioritize safety. Handling electrical components requires careful attention to avoid accidents or damage to your home.
Turn Off the Power
The first and most critical step is to turn off the power to the area where you'll be working. Locate your home's circuit breaker and switch off the corresponding circuit. Use a voltage tester to ensure that no current is flowing through the wires you'll be handling.
Gather the Necessary Tools and Materials
To install your hanging light fixture, you'll need several tools and materials. Ensure that you have everything prepared beforehand to make the process smoother:
- Voltage tester
- Screwdrivers (flat-head and Phillips)
- Wire strippers
- Pliers
- Electrical tape
- Wire nuts
- Ladder
Step-by-Step Installation Guide
Now that you're prepared let's move on to the detailed steps for installing your hanging light fixture. This guide will provide a straightforward approach to ensure a hassle-free installation.
Step 1: Remove the Old Fixture
Start by removing the existing light fixture, if there is one.
- Unscrew the Fixture: Use a screwdriver to remove the screws holding the old fixture in place.
- Disconnect Wires: Carefully disconnect the fixture's wires from the ceiling wires. Use a voltage tester again to double-check that no current is flowing.
Step 2: Install the Mounting Bracket
Most hanging lights come with a mounting bracket that needs to be installed first.
- Attach the Bracket: Position the mounting bracket against the ceiling box and secure it with screws.
- Connect Ground Wire: Attach the ground wire from your fixture to the green ground screw on the bracket.
Step 3: Connect Fixture Wires
This is the most crucial part of the installation process.
- Match Wires: Connect the black wire (hot) from the ceiling to the black wire of the fixture. Repeat for the white wires (neutral).
- Secure with Wire Nuts: Twist wire nuts over the connections and wrap them with electrical tape for added security.
Step 4: Attach the Fixture
Now, it’s time to hang the fixture.
- Position the Fixture: Lift the hanging light fixture and align it with the mounting bracket.
- Secure the Fixture: Screw the fixture into place, ensuring it is tightly secured.
Step 5: Restore Power and Test
Finally, power is restored to the circuit by switching it back on at the breaker. Test your new hanging light fixture to make sure it works correctly and provides the desired illumination.
How to Replace Electrical Outlet
Installing hanging light fixtures is a fantastic improvement, but while you're updating your home's lighting, you might also consider replacing an old or damaged electrical outlet. This task can improve safety and ensure that your electrical systems are up-to-date.
Why Replace an Electrical Outlet?
Replacing an electrical outlet might be necessary for various reasons:
- Wear and Tear: Outlets can become worn and less effective over time.
- Upgrading to Modern Standards: Older outlets may not meet current electrical safety standards.
- Improving Aesthetics: Newer outlets can better match your home’s décor.
Tools and Materials Needed
- Screwdrivers (flat-head and Phillips)
- Voltage tester
- Needle-nose pliers
- Wire stripper
- Replacement outlet
- Electrical tape
Step-by-Step Replacement Guide
Just like with the hanging light fixture, safety is paramount. Always turn off the power to the outlet you'll be working on at the circuit breaker.
Step 1: Remove the Old Outlet
- Unscrew the Outlet Cover: Remove the screws holding the faceplate in place and take off the cover.
- Test for Power: Use a voltage tester to ensure the outlet is not live.
- Unscrew the Outlet: Remove the screws securing the outlet to the electrical box.
- Disconnect Wires: Take note of how the wires are connected to the outlet, then carefully disconnect them.
Step 2: Prepare the New Outlet
- Strip Wire Ends: If necessary, strip about a half-inch of insulation from the ends of the wires.
- Connect Wires: Attach the black (hot) wire to the brass terminal, the white (neutral) wire to the silver terminal, and the ground wire to the green terminal.
Step 3: Install the New Outlet
- Position the Outlet: Place the new outlet carefully into the electrical box.
- Secure with Screws: Screw the outlet into the box securely.
- Replace Faceplate: Attach the faceplate cover with screws.
Step 4: Restore Power and Test
Turn the power back on at the breaker and test the newly installed outlet with a power tester or by plugging in a device to ensure it works correctly.
Final Thoughts
Upgrading your home with new hanging light fixtures and replace electrical outlets are two effective ways to enhance both the functionality and aesthetics of your living spaces. While these tasks may seem challenging, following these step-by-step guides can make the process manageable and rewarding. Always prioritize safety and, if in doubt, consult a professional electrician to ensure the job is done correctly. With your new lighting and updated outlets, your home will not only look better but also operate more safely and efficiently.